At present, there is no ability available inside Zendesk via a business rule (trigger or automation) to add a CC(s) to a ticket automatically. We're here to show you how you can do this by utilising a trigger & webhook combo!
This article will cover the following topics:
- Creating the webhook
- Creating the trigger
Before you begin:
- Obtain your API token - Follow the steps here to Generate a new API Token in your Zendesk account. We'll use this later for authenticating the webhook.
Creating the webhook:
-
- In Admin Center, click the Apps and integrations icon (
 ) in the sidebar, then select Webhooks > Webhooks.
 - Click Actions and select Create webhook.
- Set up your webhook with the below:
- Example of the endpoint URL: https://{SUBDOMAIN}.zendesk.com/api/v2/tickets/{{ticket.id}}.json
- Authentication: You can choose to use the authentication method which suits your security needs best. We are using Basic Authentication with an API token for this example.
- Don't forget to Save the webhook.
- In Admin Center, click the Apps and integrations icon (
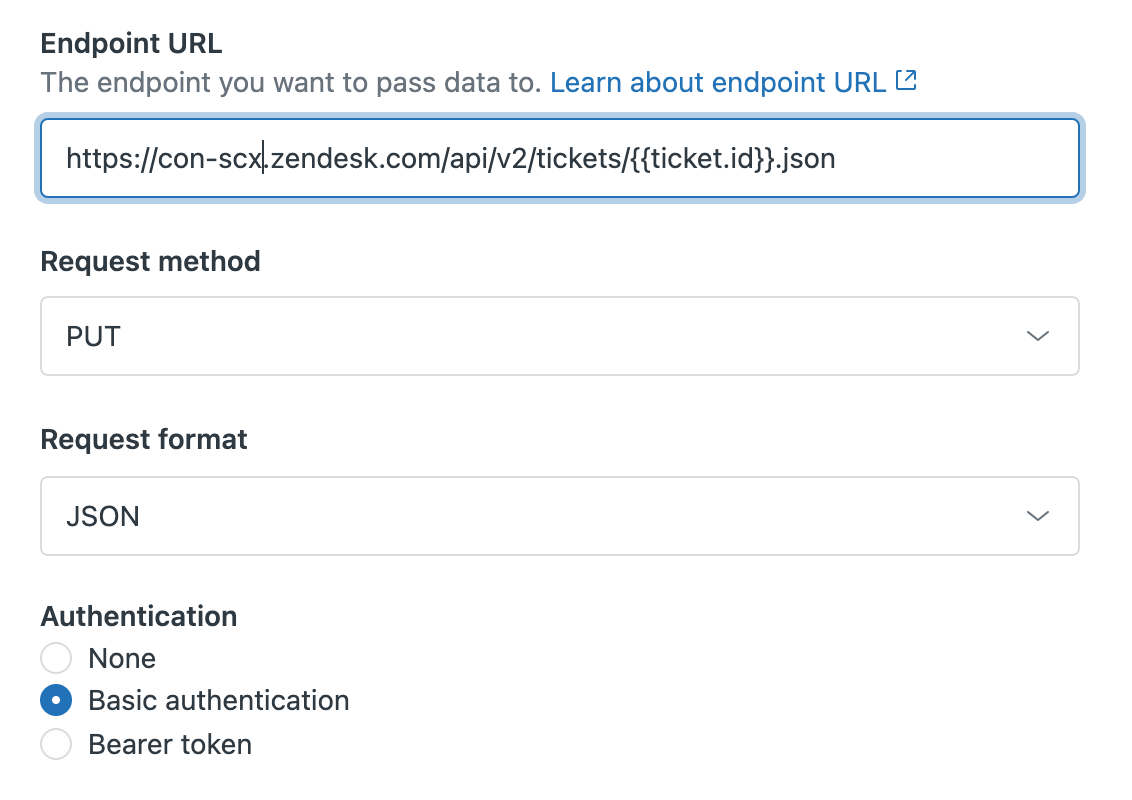
Name: Update ticket
Endpoint URL: https://subdomain.zendesk.com/api/v2/tickets/{{ticket.id}}.json
Request method: PUT
Request Format: JSON
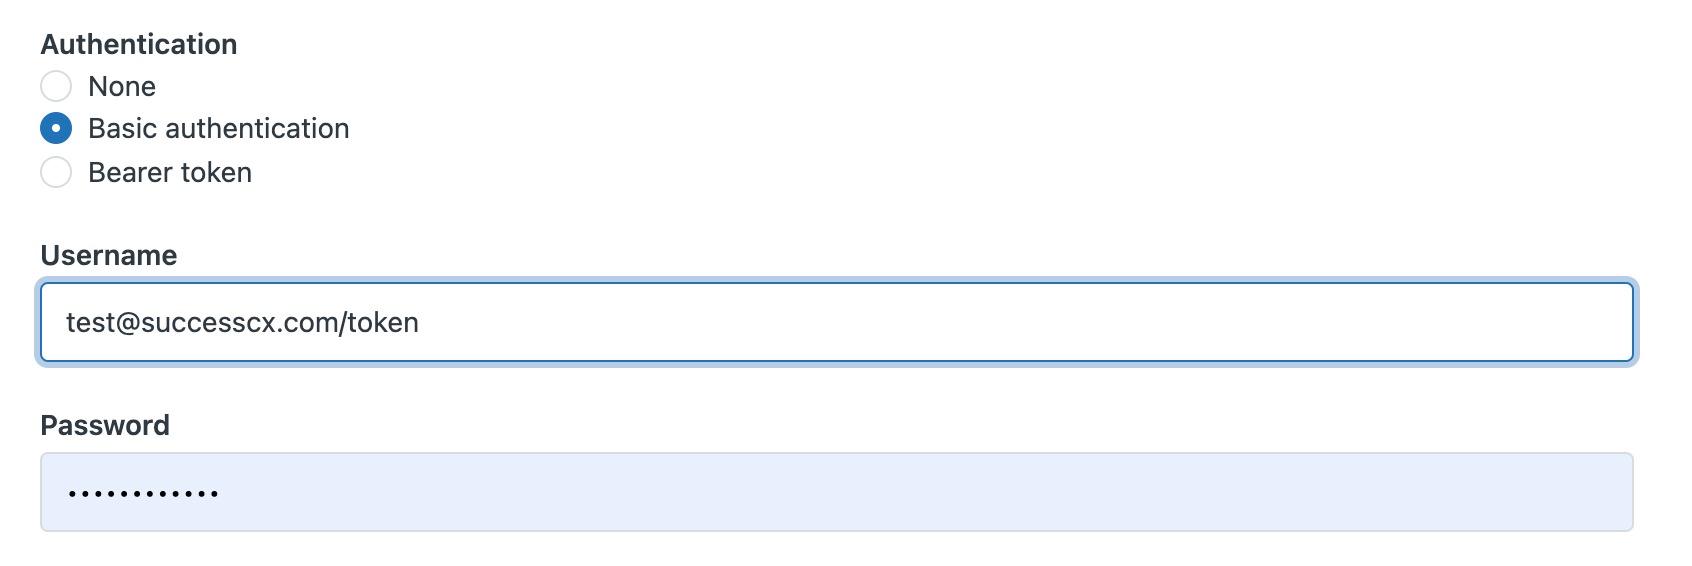
Authentication: Basic authentication
Example:
For the authentication, make sure you add the "/token" to the end of your email address in the username field and add the API token as the password.
Creating the trigger
Once you've created your new webhook, you'll next create a trigger to connect it to so the CC's can be added to the ticket automatically based on the conditions set. In this example, when a specific ticket field is set, a group of CC's will automatically be added to the ticket.
- In Admin Center, click the Objects and Rules icon (
 ) in the sidebar, then select Business rules > Triggers.
 -
Create a new trigger or edit an existing one by hovering over the options icon (
 ) and clicking Edit.
 - Under the Meet ALL Conditions section add the 2 noted conditions below.
- Under Actions, click Add action. Select Notify webhook and then select your webhook.
- Click Save after you have filled out all of the trigger settings.
Name: Auto-add CC's to ticket when AMA-Group is selected
Meet ALL Conditions:
- Ticket is Updated
- Group Member (Organisations) is "AMA-Group" (This is the custom field condition)
- Tags contains none of the following "team_ama_cc"
Actions:
- Notify active webhook = Update ticket
- Add tags = "team_ama_cc"
- JSON body =
{
  "ticket": {
     "email_ccs": [
        { "user_email": "test@successcx.com", "action": "put"}
       ]
    }
}
From this point, when the "AMA-Group" is selected the trigger fires off behind the scenes and adds the CC to the ticket.
IMPORTANT: An email notification does not fire off to the person(s) who have been CC'd on the ticket until the next public comment is submitted on the ticket. If you would like to send a public comment at the same time, please use one of the option JSON code examples below.
OPTIONAL:
You're welcome to use the following JSON code if you would like to modify this workflow.
Add multiple CC's:
{
  "ticket": {
    "email_ccs": [
       { "user_email": "test@successcx.com","user_email": "test2@successcx.com", "action": "put"}
      ]
   }
}
Add 1 CC + Send a public comment:
{
  "ticket": {
    "email_ccs": [{"user_email": "test@successcx.com", "action": "put"
      }],
    "comment": {
      "body": "This is an email notification regarding ticket {{ticket.id}} regarding {{ticket.subject}}.\n\nTicket Description: {{ticket.description}} ",
      "public": true
    }
  }
}
Add multiple CC's + Send a public comment:
{
  "ticket": {
    "email_ccs": [{"user_email": "test@successcx.com","user_email": "test2@successcx.com", "action": "put"
      }],
    "comment": {
      "body": "This is an email notification regarding ticket {{ticket.id}} regarding {{ticket.subject}}.\n\nTicket Description: {{ticket.description}} ",
      "public": true
    }
  }
}